I’ve been using Traefik for a while now, and I’ve helped quite a few people with it, but I still see a lot of people scared off it. This isn’t helped by a lot of guides being incredibly verbose, and not explaining what’s going on very well. Most people I talk to end up just sticking with whatever they’re using already, usually nginx.
Traefik has a bit of an image problem, mostly that it’s far too complex, fiddly and magic for the lowly self-hoster. This image problem is something I’ve been working on trying to change for months. To help do that, here’s a complete getting stated guide for Traefik, to complement and extend my previous Traefik basics post. It’s intentionally verbose, to explain some of the magic going on.
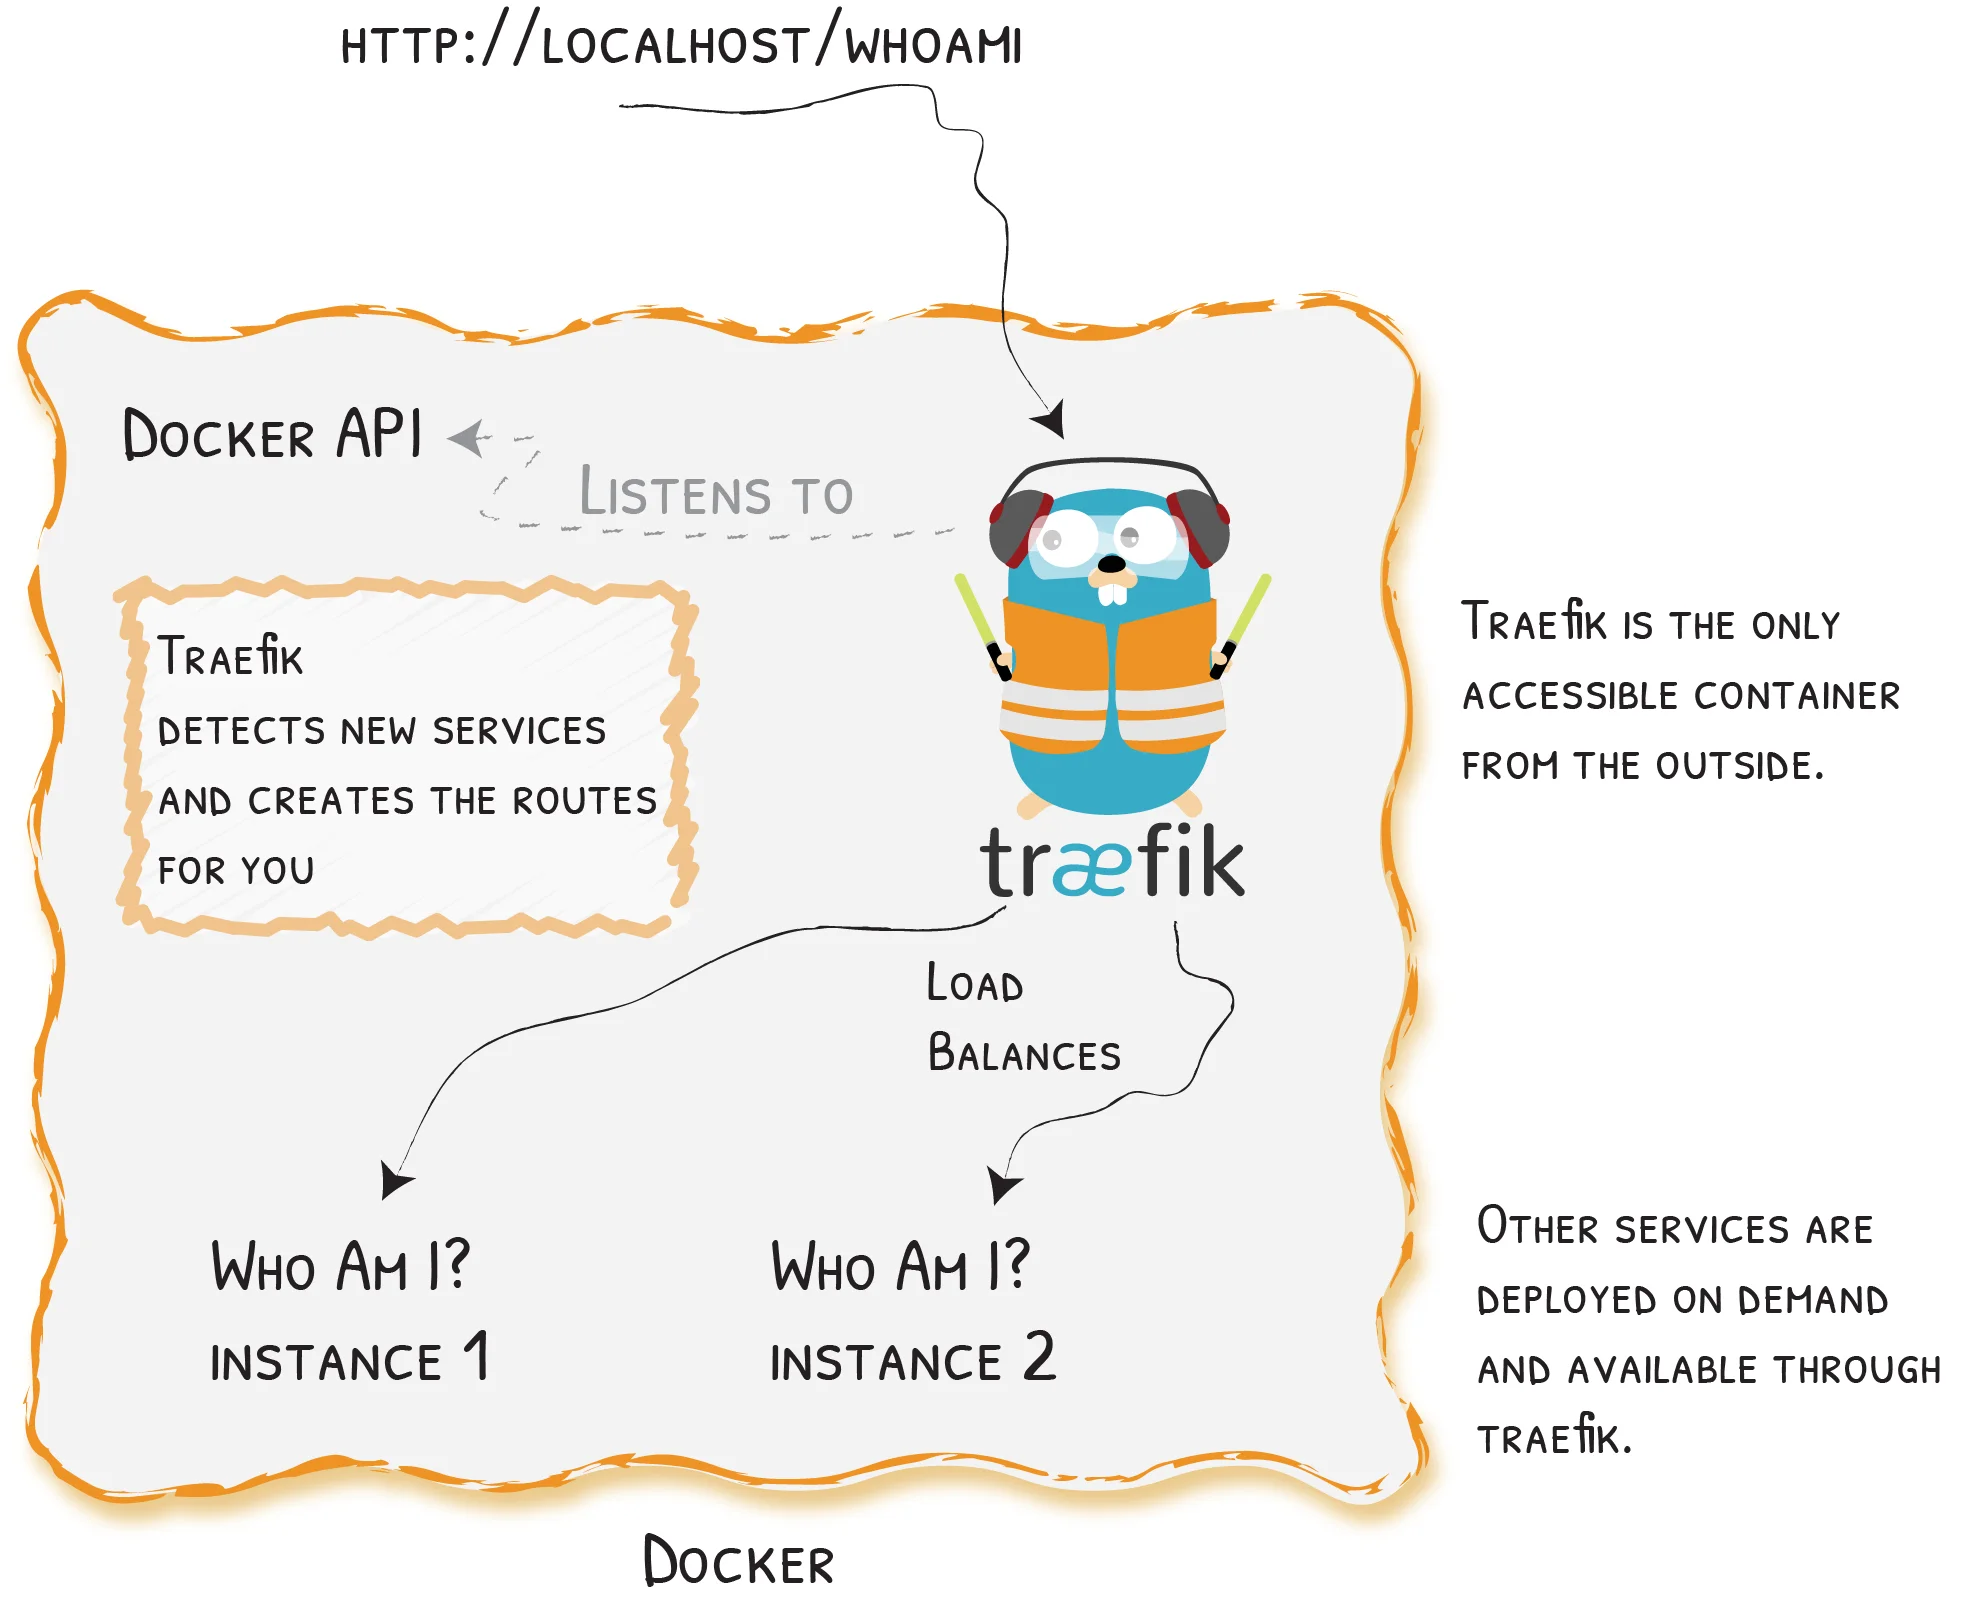
Traefik has three fundamental concepts: Entrypoints, Routers and Services.
Entrypoints define which ports and interfaces Traefik listens on for traffic. Generally you’d want one for port 80 and another for 443. Notice there’s nothing about protocols here, entrypoints can accept any protocol supported by Traefik, at the same time: HTTP, HTTPS, TCP and UDP.
Routers are what listen to entrypoints, and match domains and paths to applications. A route has a rule which identifies it, a service, and a set of middleware.
Services are your applications to route traffic to. A service may be a single container, or multiple in a load-balancing set up. Services can be either HTTP, TCP or UDP.
Diagram of a traefik route
There is a 4th fundamental: Middleware. Middleware run in between a router and service, and can modify the request or response however they see fit. Traefik has a number of useful ones built in for adding headers, redirecting, rate limiting and more. To get started, you don’t really need to worry about them, but they’ll be useful as you deploy more applications.
Traefik configuration is split into 2 types. Static configuration lives in Traefik’s main configuration file. Dynamic configuration generally lives with the thing you’re routing traffic to, which in this case is docker containers.
We need to configure the entrypoints and communication to docker in traefik.yml
Configuration for entrypoints is incredibly simple. Here we define 2 entrypoints: web and web-secure, listening on ports 80 and 443 respectively.
Next we need to tell Traefik where it can find some providers. Providers are where Traefik’s dynamic configuration comes from, and tell it how to discover services, routers and middleware.
Here we tell Traefik to communicate with docker using the docker socket. exposedByDefault makes the dashboard look cleaner, and prevents things accidentally being routable when we don’t want them to be. watch: true instructs Traefik to watch for changes to running containers, and automatically clean up or create routers and services as necessary, all without requiring a restart.
To access the dashboard, you’ll need to enable it. It’ll be incredibly useful later.
traefik.yml
api:dashboard:trueinsecure:true
Setting insecure means the dashboard is accessible to anyone and everyone on port 8080. For a production deployment, you’ll likely want to create your own router to add a layer of authentication, or just block the port with a firewall. But for now, this is fine.
Let’s unpack this, as there’s a few subtle things going on here.
The docker socket is bound the container read-only, so Traefik only has read-only access to Docker, for slightly increased security.
I intentionally mount a directory in rather than just the traefik.yml to handle future expansion like TLS certificates. Make sure the configuration file made above is named traefik.yml inside the traefik/ directory.
For ease, I’ve also set network_mode: host. This means Traefik binds directly to ports on the host. The primary reason is because it allows Traefik to communicate with the upstream containers more easily and without defining a custom bridge network.
Now we’ve got a Traefik configuration, and a docker configuration to run it, we can start Traefik and check it’s all working. Once the container has been downloaded and started, Traefik is running, congratulations!
If you browse to either ports 80 or 443, you’ll be met with a 404 page, this is normal. This happens because there’s no router matching the request - We’ll fix that later.
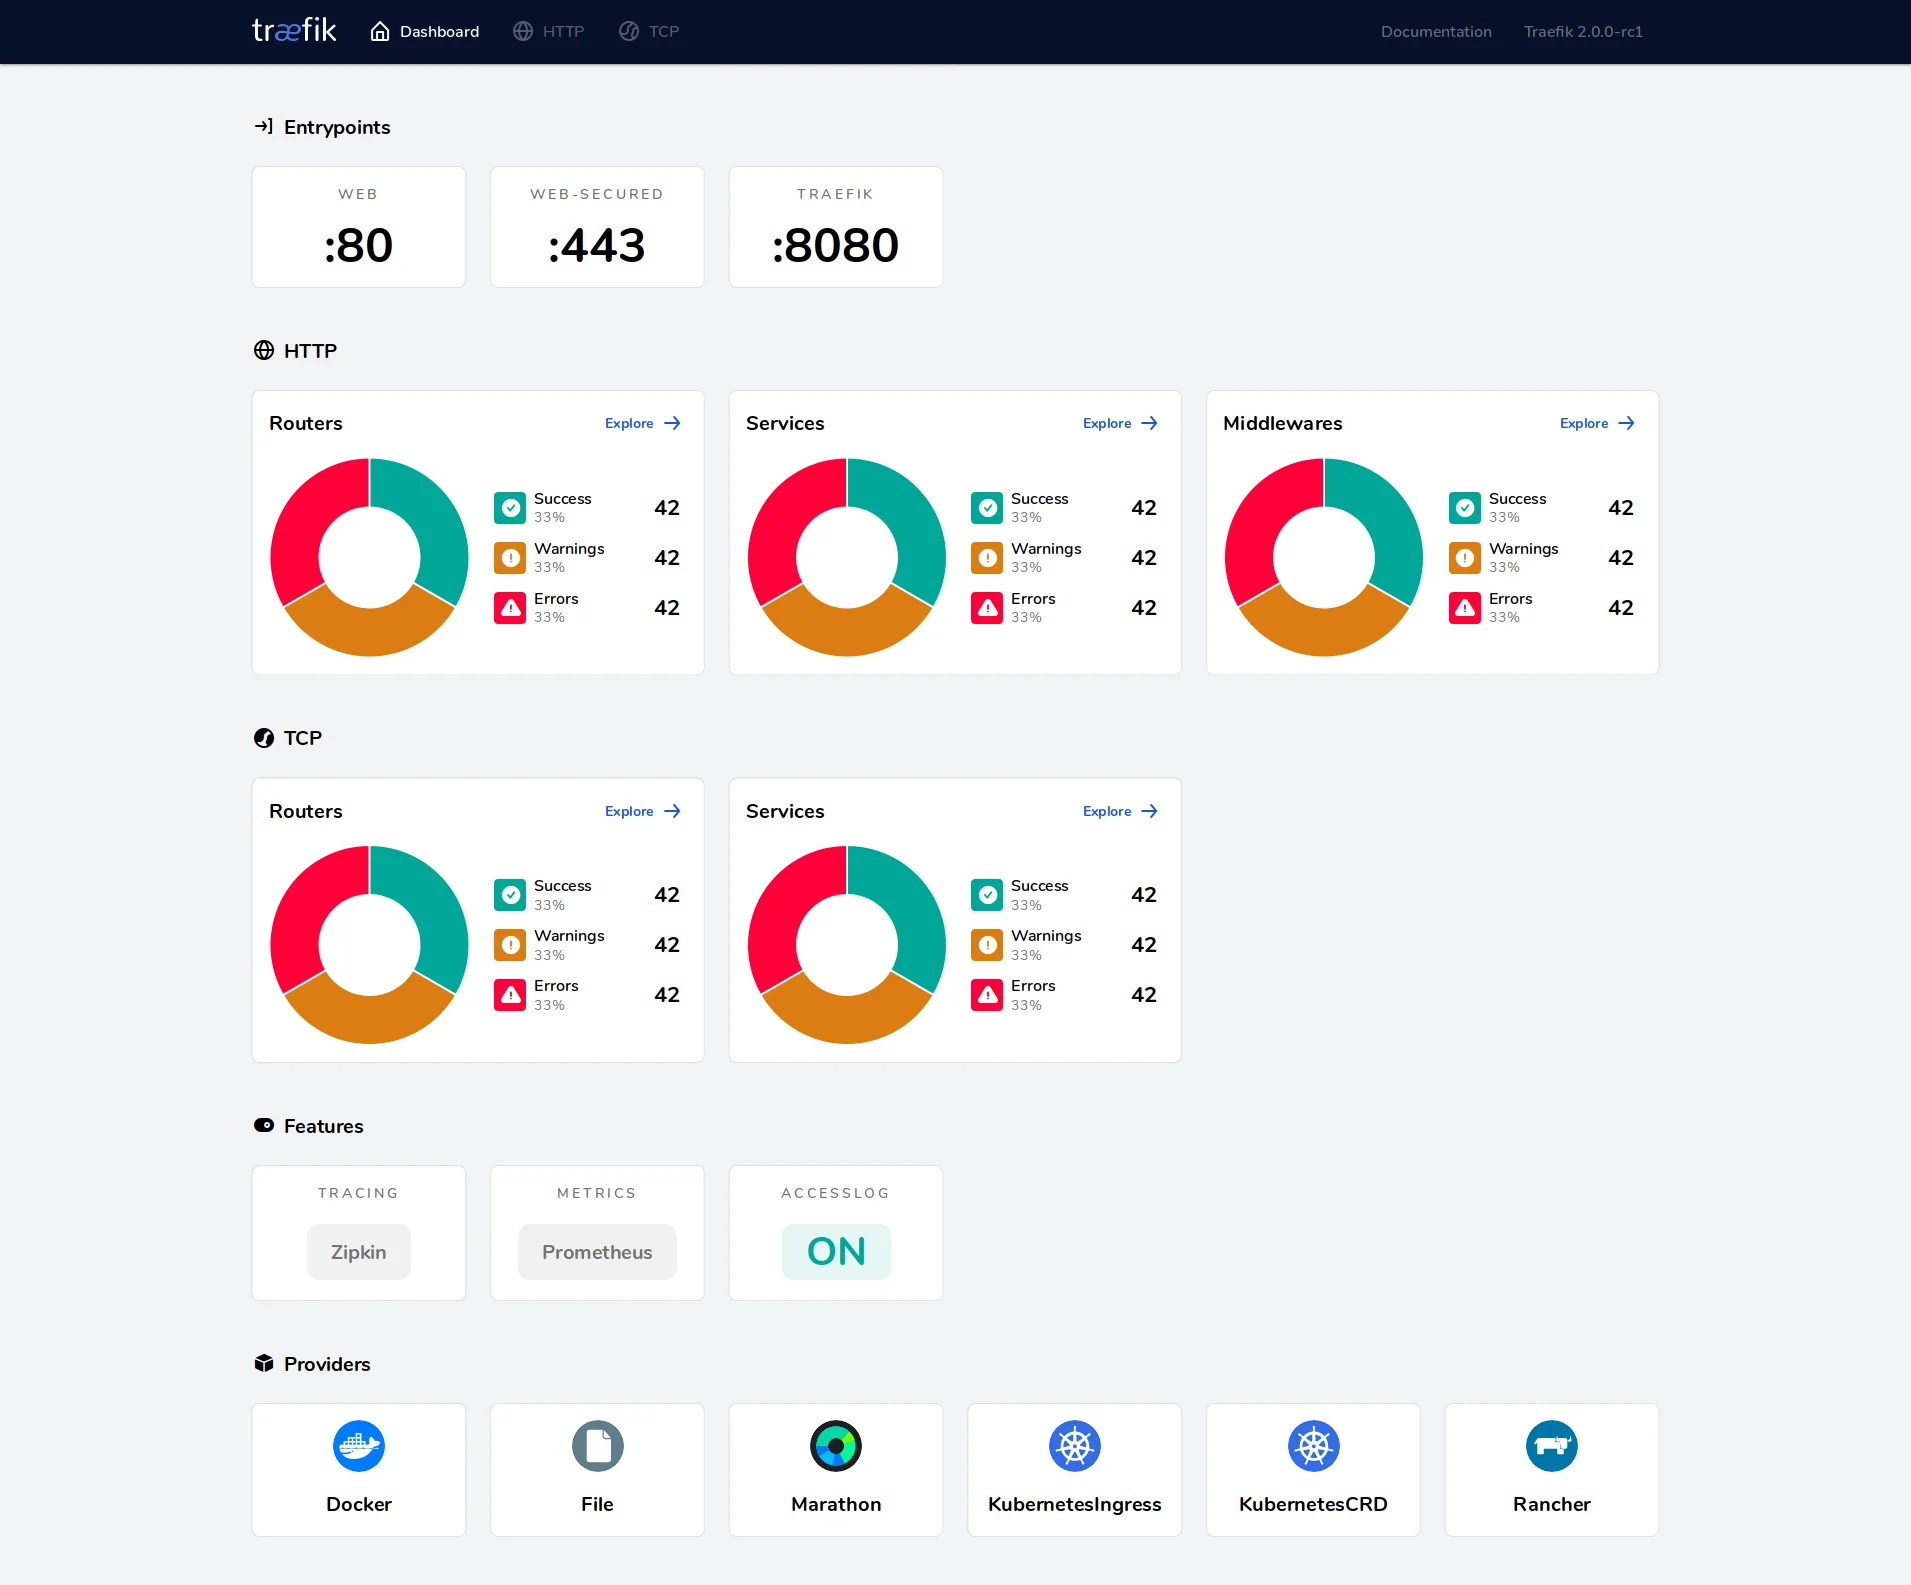
Whilst we only defined 2 entrypoints, Traefik actually defines an additional one, on port 8080. This is used by default for the dashboard but can be used by your applications if you want, or disabled entirely. If you browse to port 8080 now, you’ll be met by the Traefik dashboard.
Traefik dashboard
The dashboard shows which entrypoints, routers, middleware and services are active, and how they’re configured. This is an incredibly powerful tool for debugging what’s going on with Traefik, and which services and routes it’s picking up on.
Now that we’ve got Traefik up and running, it’s time to get an application behind it - Traefik is after all a reverse proxy. For this, I’m going to use whoami, a dead simple container which simply returns some relevant information on the request. Take a look at my instance, also deployed behind Traefik.
The first step is to define the compose file for your application. Personally I have each application in a separate compose file, but it doesn’t really matter
The port published here is purely for testing, we’ll remove it shortly. Once started, this will be accessible on port 8000, where you’ll be able to see it working and responding to requests correctly.
Now for the moment you’ve been waiting for: How do we expose this container through Traefik? Well actually, it’s incredibly simple!
The first step is to remove the port publishing. This isn’t actually required to serve through Traefik, but once traffic can be routed through Traefik, we won’t need it any more.
Step 2 is to tell Traefik to watch this container, and configure the router to accept traffic.
This is what the docker-compose.yml looks like now:
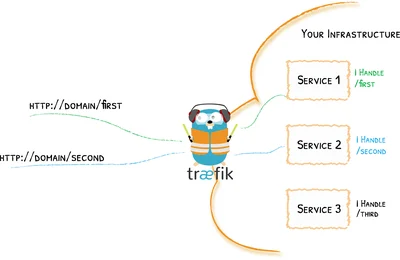
The docker provider automatically creates a router and service for each compose file and container. This compose file lives in the directory whoami/, so mixed with the rules of docker-compose, we have a router called whoami, and a service called whoami-whoami. The only piece of configuration we need to do is specify the rule for the router to pass traffic to the right service. Traefik will by default expose routers on all entrypoints, however this can be configured.
Because we modified the docker-compose.yml, simply restarting whoami isn’t enough - We have to explicitly bring it down, then back up again. Because we specified watch: true in the Traefik configuration, it will keep an eye on the running containers and react to changes automatically without requiring a restart.
Once whoami is running again, we can take a look at the Traefik dashboard under the “HTTP” tab and notice that the router and service are up and running, and detecting correctly.
To check it’s actually running correctly, we can use curl. Something like:
Now you’ve got the basics of an application being accessible through Traefik and correctly determining which hostname should serve which service. However, there are a few more things before you’re quite ready to ship it in production it’s definitely worth knowing about!
It’s 2020, there’s no excuse for not running over HTTPS, even for personal-use applications. Traefik has first party integration with LetsEncrypt, who provision free TLS certificates quickly and easily.
Traefik’s TLS configuration works by defining certificate resolvers. These are applied to routes, and provision certificates for them based on the host rule.
The easiest way to get started is using LetsEncrypt’s HTTP challenge. This way you simply need Traefik accessible on the domain you’d like a certificate for, and Traefik takes care of the rest. Here we specify the email address to associate with the certificate (mostly for renewal notifications), where the certificates should be stored, and which entrypoint the HTTP challenges should be sent to.
After this, it’s just 1 more label for our container, and we’re done:
docker-compose.yml
-traefik.http.routers.whoami.tls.certresolver=le
This tells our whoami router to use a certificate provisioned by the le certificate resolver, which we just defined above.
Once you set this label (and restart both Traefik and whoami), Traefik should pick up on the change, and attempt to provision the certificate. It only only take a minute or 2, at which time you’ll be able to check your site over HTTPS:
Unfortunately, the certificates are not stored in the conventional format, they’re stored in Traefik’s own acme.json. This file is easy to read, but will require manually extracting the certificates should you need to use them elsewhere (not that there’s really a need to).
If the certificate doesn’t issue correctly, be sure to take a look at Traefik’s logs for any error messages (you might need to enable debug logging before they show up).
The most common use case for Traefik is for it to magically handle routing to applications through providers like Docker. But what if you have applications outside Docker which you want to route to using Traefik? Or applications on separate machines altogether? Are you meant to run a separate reverse proxy for those? No need!
Traefik supports many providers, 1 of which is docker. Another which we’re going to take advantage of here is the aptly named file provider, which lets you define your routers and services by hand in a config file.
Let’s break this down. Here we’re defining a router and service, in much the same way as we have with our docker-based applications (the configuration is practically identical), but with 2 important distinctions:
The upstream URLs need to be explicitly defined (http://192.168.1.99:8123/)
The router needs to be explicitly linked to our service (service: otherservice)
This setup will instruct Traefik to forward traffic from other.example.com to http://192.168.1.99:8123/, and also provision a TLS certificate so it can be reached on https://other.example.com. Because Traefik terminates the TLS, and doesn’t pass it on, the upstream application doesn’t need to know or care that the original request used HTTPS (although it can tell if it needs to with the X-Forwarded-Proto header).
Save the file, and restart Traefik, and it’ll start routing. Future edits won’t require a restart, due to the watch: true setting.
A common requirement for reverse proxies is to forcefully redirect traffic from HTTP to HTTPS.
The first way most people think to do this is to apply the redirectscheme middleware to each and every router. Whilst this does work, it’d be far better if this only needed to be defined once, and magically reused for each application, right?
Fortunately, Traefik’s got you covered. Entrypoints allow you to set a redirection on them, such that all traffic to them is redirected to a different entrypoint on a given scheme.
In this example, Traefik will redirect all traffic on port 80, to port 443 and HTTPS. Because this is done at the entrypoint level, services don’t matter. All traffic will get redirected, regardless of its destination.
For some, this is too magic, and unfortunately the abstraction is a bit leaky, as it shows up in the dashboard. What Traefik does here is define a new router on the entrypoint, with a rule designed to catch all traffic, and apply the redirectscheme middleware to it to force it to redirect to a different entrypoint. Simple!
If you take a look at my file provider, I’ve implemented this manually.
If you’ve reached this point, congratulations! You’ve now set up Traefik as a reverse proxy for multiple applications, both in and outside of Docker, with auto-renewing TLS.
Your Traefik set up may grow, both in terms of number of containers, and size of configuration file - Here’s mine. But once you understand the fundamentals, it’ll scale to whatever your needs may be.
Traefik’s dashboard is a great tool to diagnose routing issues, and check services are being detected correctly, but it can’t do much more than that. It doesn’t show any metrics. Instead, it relies (arguably correctly) on external monitoring tools for metrics. Traefik supports 4 metric backends: Datadog, Prometheus, StatsD and…
Traefik is a cloud native reverse proxy, which is basically a fancy way of saying it’s a reverse proxy with some fancy features. Specifically it has fancy features around auto-discovery, and deep integration with technologies like Docker and Kubernetes.Basic concepts Traefik has four fundamental concepts: Entrypoints, routers, middleware and services.…
Recently, I decided to put some analytics on my website. Would be nice to see what view number are like and what pages get the most traffic. Most people would just stick Google Analytics on and be done with. But the privacy implications off that are huge and terrible, not…