I've never been a huge fan of cameras inside my house. The idea of a network-connected camera lens pointing around my house doesn't fill me with very warm feelings. However, as time goes on, the value of being able to be nosy on my own home when I'm not there grows. There are plenty of nice camera brands out there, but I want something guaranteed to be LAN-only, affordable, and fun to tinker with.
A lot of people I've spoken to recommend Wyze cameras, not only because of their inexpensive price, but the fact you can (with some additional first-party firmware) get the raw camera feed over RTSP. Reolink have also come recommended, and has native HomeAssistant integration. I'm not using either for similar reasons.
If I am going to have a camera in my house, it's absolutely not going to have any kind of internet access whatsoever, which means it needs to be firmware I control, or network isolated. I don't currently have a network capable of device isolation like that (that's a future project, don't worry), so I can't quite trust Wyze, Reolink, or anyone else for that matter, on my network.
There are a few other alternatives online which might claim to be LAN only, but if it's got even the potential of talking to the internet, it's a no from me. I'll need something a little more DIY.
When it comes to physical, custom-made home automation "widgets", I'm a huge fan of ESPHome because of its huge feature-set, ease of use, and the fact it's firmware compiled entirely by me. The fact I can take a YAML file, add in simple components like a button or more complex ones like a fan (or even camera) and get out of it custom firmware which works natively with HomeAssistant makes building projects incredibly simple.
Dotted around the home, I already have a few different ESP-based devices doing different things, from a basic temperature sensor to a lighting controller for christmas lights. It'd be great if I could reuse the ESPHome infrastructure I already have, but create a camera instead. ESPHome has a camera component built-in, I just need to do something with it.
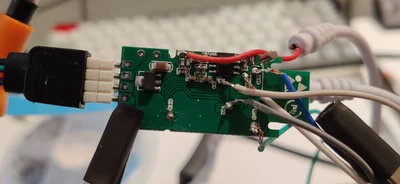
To create an ESP-based camera, you just need an ESP32 (The ESP8266 isn't powerful enough to function as a camera) and a camera module. Whilst you can purchase these separately if you already have some ESP32s lying around in a draw, it's quite easy to find bundles which have a camera and ESP32 in a single package - quite useful for smaller deployments.
I bought 2 ESP32-CAM-MB development boards for ~£15. These have an ESP32, OV2640 camera and a flash LED (which is surprisingly bright). I've got some spare ESP32's already, so I could have reused those, but as a quick project, these work fine. For future projects, I would probably buy the modules separately, which might have made mounting easier, but more on that later.
<tangent>
I couldn't find any with camera modules and PoE if that's something you're in to. I don't need PoE, and if you do you can always use external modules
As with all ESPHome projects, the first step is to create a new device and add your network credentials. Make sure to tell ESPHome the correct device you're using so it can compile the right firmware.
YAML
esphome:name:my-camplatform:ESP32board:esp32dev
<tip>
If you haven't already, I highly recommend adding the captive_portal component to all your ESPHome devices - it makes recovering from network changes much faster!
</tip>
And of course, you'll need an esp32_camera component:
The esp32_camera component has a number of required configuration options. This might seem a little unwieldy at first, but it's fairly simple. A camera is a much more complicated sensor than something like a button, and exposes much more data. To achieve this, it requires a whopping 15 different pins (8 for the image data alone). There's plenty of documentation how referencing the pins in the ESPHome documentation.
If you've purchased a pre-built module however, it's not always clear which pins from the camera are wired up where. If you're lucky, there's a spec sheet which tells you which pins are connected where. Otherwise, it's trial and error. At the bottom of the module documentation are a few examples of camera modules and the required configuration.
My "diymore ESP32-CAM-MB" aren't mentioned at all however. As with many things in the world of electronics, just because you've bought something from 1 brand, doesn't mean it's not the same as another. In my case, the wiring for my module is identical to the Ai-Thinker module listed, and its configuration works perfectly.
With a configured YAML file, just upload it to your device using your tool of choice (ESPHome-Web, esphome-flasher etc) and you're all set.
Once ESPHome has been flashed successfully and the board has booted, it should be detected by HomeAssistant and expose the correct components. Once adopted, you can preview the camera feed and test the flash to make sure everything works as expected.
Now just place the camera somewhere sensible, with reasonable WiFi coverage, and enjoy.
Projects like this are made so much easier with 3D printers. I don't own a 3D-printer, so a perfect-looking case is a little out of the question. If you do have one, Thingiverse is almost certainly your friend.
For me however, I purchased a small plastic box from Ebay for an obscene amount of money given what it is, and used a mixture of a drill and some files to make a hole for the lens and flash. It's definitely one of those projects which looks worse the closer you get, but I just don't look at it very often and I quickly ignore it. Because the module is a single piece, the measurements and holes had to be precise. When purchasing a case, I made a rookie error in forgetting to account for the points of the GPIO pins which poke through the bottom of the PCB, so the camera doesn't quite fit in the case with the lid flush, but it's closed enough. On the plus side, because the assembly is only held in place by the camera lens, having a snug fit prevents it from rattling around in the case.
Because the device is now enclosed, I added a small heat sink to the top of the ESP32's heat-spreader, to assist even slightly with passive heat dissipation. I purchased a kit of a few different sized heat sinks a long time ago - they come in quite handy for small projects like this.
The biggest downside of building something myself has to be the image quality. The image size and FPS from the ESP32 just can't match something off-the-shelf.
But depending on your use case, that might not be a problem. If you just want to check on something, then a smaller resolution camera should work just fine.
Whilst the camera module which came with my board assembly isn't great, there are plenty of others out there boasting higher resolution, better image quality and even wider FOV. Most of these come as individual modules, with a pin-out you can connect to an ESP32 or many other similar boards.
Whilst greater FPS can make a huge difference to gamers, so too can it for camera enthusiasts. Chances are, your view of this website is updating on your monitor around 60 times per second (60FPS / 60Hz), or perhaps you're reading on a phone with a 120Hz screen, in which case it'll be a little more. Both of those numbers are far outside the reach of this little camera. As with everything in life, tuning the image quality is a case of balancing dials until you get something you want. If you need more pixels, or a clearer image, it'll update slower. If you want the image to update more frequently, expect to sacrifice image quality. The main tunables you can play around with are resolution and jpeg_quality.
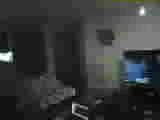
If you were expecting to get 60FPS out of this device, I'm afraid your expectations are a little too high - an order of magnitude (and a bit) high. Even setting the camera to the worst possible image, 12FPS was the best I could get out of it. And I assure you, there's very little you can do with a 160x120 image:
A 160x120 image with JPEG quality 63 from the camera. I warned you it was bad.
I did some playing around, and these are a few figures I came up with for reference.
Resolution
JPEG Quality (lower is better)
Frames per second
160x120
63
12
160x120
50
8
1280x1024
45
~1.2
1024x768
45
2
800x600
40
4
1920x1080
50
1
1920x1080
35
1.4
1024x768
30
1.7
<note>
Anything with a ~ in it is a vague guess of me looking at the logs scrolling past
</note>
For my cameras, I've settled on 1024x768 with a JPEG quality of 30. It strikes the balance enough for me of superior image quality, a reasonable number of pixels, and enough frames per second for me to see roughly what's going on.
As for what the bottleneck is, I highly suspect it's processing power. The ESP32 is a fantastic heart for a small temperature sensor, IoT lightbulb, or similar simple circuit, but it just doesn't pack enough punch to function as a camera. Under the hood of the ESP32 is a dual-core CPU running at 160MHz or 240MHz, with a whopping 320KiB RAM. I assure you, whatever beats at the heart of a Wyze camera, it's a lot more than that.
Just because I'm happy with the camera, doesn't mean it stays up in the house. If my significant other (SO) isn't happy with it, it doesn't go up (she's much more into home decor than I am, anyway).
The SO approval factor on this is high enough for her to be happy, and me to keep having an SO, but I think mostly because it's a whole lot better than nothing. The frame-rate isn't the best, but for just seeing what's going on in a room, it's absolutely fit for purpose - especially when the bill of materials is under £10 per camera. The biggest dent to the approval factor is definitely the aesthetics - I can't come even close to something off-the-shelf. A white box fits in with the white wall just enough for her to be happy, and for guests not to be completely confused with what's hanging off our walls.
Similarly, there's the nighttime performance. Looking in at what's going on in dark rooms can be crucial when using a device like this as a security camera. Sure, there's a flash LED on the board, which is surprisingly bright, but it's not remotely bright enough to light up any sized room. With that said, it lights up our hall pretty well, with the side benefit of being able to daze any would-be intruders.
It's been a few weeks since I deployed a couple of these cameras around my house, which I first purchased November 2022.
Are they very good? No, not really. But then they're not really trying to be. Strapping a high-intensity sensor like a camera to a lower-power device like an ESP32 is like using a pedalo to cross the Atlantic - sure, it's possible, and it makes quite the story, but there are better ways.
Are they value for money? Yes, at least to me. It's been a fun side project to build, and they're functional enough for what I need. Not to mention they've created some interesting content to write a post about. Sure, a Wyze camera is 10x the price, but it's not 10x the camera (although it sure can be when combined with a proper NVR like Shinobi or Blue Iris).
Would I be better off with something else? Probably, but for now they're good enough for me. If you're looking for a proper indoor camera, you should disregard everything I've said here and go buy something already built. It's fractionally more expensive, but with better looks, both in itself and of the resulting video. If however you're on a budget, want something incredibly simple, built from scratch and low power, they make a pretty good gateway drug before investing in a proper camera system.
I recently added some RGB LED strips around my headboard and bed frame, because everyone needs more RGB in their life. The only thing better than RGB is internet connected RGB. One of the most common controllers for this is the MagicHome. The MagicHome comes with its own firmware, which…
The majority of England (where I live) is being hit by quite a heatwave. It’s hot here, like really hot! Us brits are incapable of handling the heat, and enjoy nothing more than telling each other how hot and unbearable it is. I’m definitely guilty of this, and as a…
As part of some recent infrastructure changes, I migrated my home DNS to AdGuardHome, from Pi-Hole. Being a single, self-contained binary, it's far easier to install and manage (it's in the AUR too), and it's got a few nice modern features like DNS-over-HTTPS and DNS-over-TLS. Sure, the ad blocking features…